Everything You Need to Know for a Safe, Efficient, and Long-Lasting Power Upgrade
1. Introduction
Golf cart batteries are the beating heart of your vehicle, determining how far you can drive, how fast you accelerate, and how reliably you can enjoy your rounds of golf or community rides.
Whether you’re upgrading to a brand-new lithium system or simply replacing your worn-out lead-acid batteries, proper installation is critical.
Incorrect installation can lead to performance loss, premature failure, or even dangerous electrical hazards.
In this comprehensive guide, we’ll walk you through everything you need to know — from understanding battery types, preparing tools, and safely removing old batteries to installing new ones, testing performance, and keeping them in top shape for years to come.
2. Golf Cart Battery Basics
2.1 Main Battery Types
Golf cart batteries come in several chemistries, each with unique characteristics:
| Type | Example Voltage | Lifespan (Years) | Maintenance | Weight | Cost | Best For |
|---|---|---|---|---|---|---|
| Flooded Lead-Acid (FLA) | 6V, 8V, 12V | 4–6 | High (water top-ups) | Heavy | $ | Budget, traditional carts |
| AGM Lead-Acid | 6V, 8V, 12V | 4–7 | Low | Medium | $$ | Moderate use, less maintenance |
| Lithium (LiFePO₄) | 36V, 48V, 72V | 8–12+ | Very Low | Light | $$$ | Long range, high performance |
2.2 Voltage & Capacity Matching
Your golf cart’s total system voltage is determined by the number of batteries and their individual voltages.
For example:
-
48V system → 8 × 6V batteries or 6 × 8V batteries, or 1 × 48V lithium pack
Always match the voltage and capacity to your cart’s controller and motor requirements.
3. Preparation Before Installation
3.1 Safety First
Before you even touch a wrench, follow these precautions:
-
Wear insulated gloves and safety goggles
-
Work in a well-ventilated area
-
Avoid smoking or open flames
-
Have baking soda nearby to neutralize acid spills (for lead-acid batteries)
3.2 Tools & Supplies Checklist
-
Insulated socket wrench set
-
Multimeter (for voltage testing)
-
Terminal cleaning brush
-
Battery lifting strap or handle
-
Anti-corrosion spray
-
Torque wrench (for proper tightening)
-
Protective mats or wood boards (for the floor under batteries)
3.3 Inspect the Cart
-
Photograph the wiring layout before removing anything
-
Check for frayed wires or corroded connectors
-
Ensure your new batteries match the cart’s required specs
4. Removing Old Batteries
Step-by-Step Removal
-
Turn Off Power — Disconnect charger and turn key switch to OFF
-
Remove Negative First — Always disconnect the negative (-) terminal before positive to avoid sparks
-
Loosen & Remove Cables — Keep them organized to avoid mix-ups later
-
Lift Out Batteries Carefully — Lead-acid batteries can weigh 60–80 lbs each
-
Inspect for Leaks or Cracks — If damaged, handle with extra caution
-
Recycle Properly — Take old batteries to an authorized recycling center
5. Cleaning the Battery Tray
-
Use a baking soda + water mix to neutralize acid residue
-
Remove rust with a wire brush
-
Apply anti-rust spray or paint
-
Install protective mats to prevent future corrosion
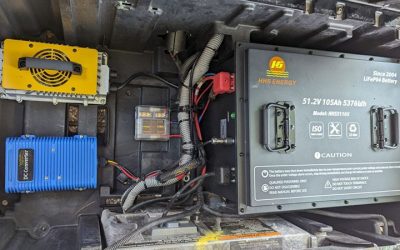
6. Installing New Batteries
6.1 Positioning
-
Place batteries so terminals match the original layout
-
Keep them snug but not jammed together (allow airflow)
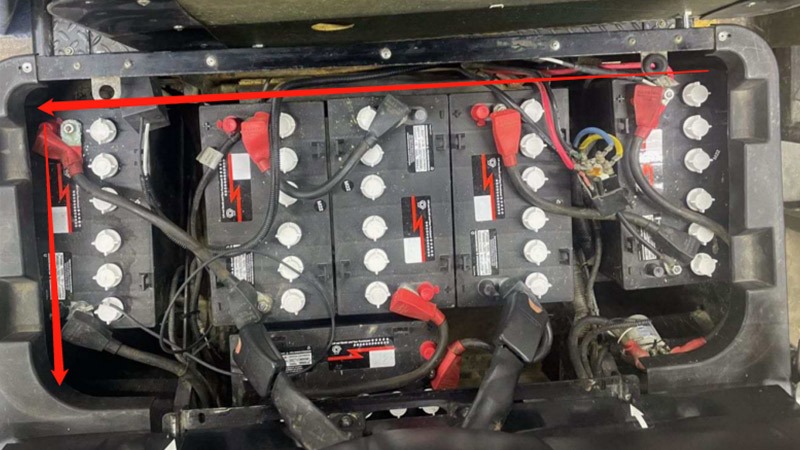
6.2 Wiring
-
Follow your photos or wiring diagram exactly
-
Connect positive to negative in sequence to create the series voltage
-
For parallel connections (rare in carts), connect positive to positive, negative to negative
6.3 Tightening
-
Use a torque wrench to tighten terminals to manufacturer specs
-
Over-tightening can damage posts; under-tightening can cause arcing
7. Lithium vs Lead-Acid Installation Notes
| Feature | Lead-Acid | Lithium |
|---|---|---|
| Weight | Heavy | Light |
| Charging | Standard charger | Requires lithium-compatible charger |
| Wiring | Multiple batteries in series | Often single drop-in pack |
| Maintenance | Water top-ups | None |
| Cost | Lower upfront | Higher upfront, lower lifetime cost |
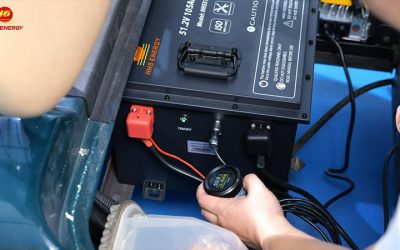
8. Testing After Installation
-
Use a multimeter to check system voltage
-
Perform a low-speed test drive to ensure smooth acceleration
-
Check terminals for heat after 5–10 minutes of driving
-
Ensure your charger starts charging normally
9. Maintenance Tips
-
Charge after every use — avoid deep discharges
-
Clean terminals every 1–2 months
-
For lead-acid: Check water levels monthly
-
For lithium: Keep BMS firmware updated (if applicable)
-
Store batteries fully charged if leaving cart unused for more than 30 days
10. Troubleshooting Common Issues
-
Cart won’t start → Check main fuse or loose cables
-
Short runtime → Battery may be undercharged or sulfated
-
Slow charging → Charger may be faulty or wrong type
-
Uneven battery voltages → One or more batteries are failing
11. Frequently Asked Questions
Q1: Should I replace all batteries at once?
Yes — mixing old and new batteries reduces lifespan of all units.
Q2: Can I switch from lead-acid to lithium?
Yes, but you may need a compatible charger and possible controller updates.
Q3: How long should my batteries last?
Lead-acid: 4–6 years. Lithium: 8–12 years, with proper care.
12. Final Safety Reminders
-
Always disconnect power before working
-
Avoid placing tools across terminals
-
Recheck torque on terminals after the first week of use
Conclusion
Installing golf cart batteries the right way will reward you with better performance, longer lifespan, and safer operation.
Whether you choose traditional lead-acid or modern lithium technology, following these steps ensures your cart stays reliable for years to come.