The Complete Step-by-Step Guide to Converting Your Golf Cart to Lithium Power
Introduction: Why Upgrade to Lithium?
If you’re reading this guide, you’ve likely already decided that lithium is the future for your golf cart. Perhaps you’ve experienced the frustration of lead-acid batteries dying mid-round, or you’re tired of the weekly ritual of checking water levels and cleaning corroded terminals.
Whatever your motivation, you’re about to embark on one of the most rewarding upgrades you can make to your golf cart. This guide will walk you through every single step of the process, with detailed explanations and visual descriptions that make the conversion accessible even if you’ve never touched a battery before.
Before We Begin: A Quick Reality Check
Upgrading to lithium is straightforward, but it requires attention to detail. Set aside 2–4 hours for your first conversion. Gather all tools beforehand. Read through this entire guide before touching a single wire.
Let’s transform your cart.
Part 1: Pre-Installation Preparation
1.1 What You’ll Need – Tools and Materials
The Lithium Kit:
-
Your new lithium battery (typically a 48V or 36V LiFePO₄ pack)
-
Lithium-specific charger (crucial—never use your old lead-acid charger)
-
Mounting brackets or hardware (often included with quality kits)
-
Battery cables (if your kit doesn’t include them, you may need new ones with different lug sizes)
Tools Required:
| Tool | Purpose |
|---|---|
| Safety glasses | Protect eyes from debris and accidental sparks |
| Work gloves | Acid-resistant if handling old batteries |
| Socket wrench set | Removing battery terminals and hold-downs |
| Adjustable wrench | Backup for stubborn nuts |
| Multimeter | Verify voltage and proper connections |
| Wire brush or terminal cleaner | Clean existing cable ends |
| Battery carrier strap | Safe lifting of heavy lead-acid batteries |
| Plastic tub or tray | Holding old batteries during removal |
| Zip ties | Cable management |
| Marker and tape | Labeling wires |
1.2 Know Your Cart
Before purchasing your lithium battery, verify these three critical specifications:
Voltage: Is your cart 36V or 48V? Check your existing battery configuration. Six 6V batteries wired in series = 36V. Six 8V batteries = 48V. Four 12V batteries = 48V.
Physical Space: Measure your battery compartment. Lithium batteries are often smaller than the combined lead-acid pack, but you need to confirm dimensions.
Terminal Orientation: Note where positive and negative connections are located on your existing setup. Your lithium battery should allow comfortable cable routing.
1.3 Safety First
WARNING: Lead-acid batteries contain sulfuric acid and produce explosive hydrogen gas. Work in a well-ventilated area. No smoking, no open flames, no sparks.
Lithium batteries are safe when handled properly, but they are powerful energy sources. Never short the terminals. Always disconnect the negative terminal first and reconnect it last.
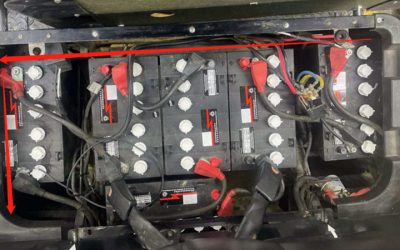
Part 2: Removing Your Old Lead-Acid Batteries
2.1 Document Everything
Before you disconnect a single wire, document your existing setup.
Take Photos:
-
Wide shot of the entire battery compartment
-
Close-ups of wiring configurations
-
Photos showing which cables go where
Label Wires:
Use masking tape and a marker to label every cable. Common labels include:
-
“Main Positive” (goes to cart)
-
“Main Negative” (goes to cart)
-
“B+ to B-” (for series connections between batteries)
If your cart has accessory wires (lights, meter, etc.), label these clearly.
2.2 Disconnect in the Correct Order
Step 1: Put on safety glasses and gloves.
Step 2: Locate the main negative cable (usually black) connected to the battery pack. This is your first disconnect.
Step 3: Using a socket wrench, loosen the negative terminal bolt and remove the cable. Tuck it away from any metal surfaces.
Step 4: Locate the main positive cable (usually red). Loosen and remove it. Tuck it away.
Step 5: Now begin disconnecting the series cables between individual batteries. Again, your labeled photos are your roadmap.
Pro Tip: Some cables may be stiff or corroded. Apply gentle twisting motion while pulling to break them free. Never yank on wires.
2.3 Removing the Batteries
Step 1: Remove any hold-down brackets or straps securing the batteries.
Step 2: Check if batteries have carrying handles. If not, use a battery carrier strap.
Step 3: Lift each battery straight up. Lead-acid batteries are heavy—use proper lifting technique (lift with your legs, not your back).
Step 4: Place removed batteries in a plastic tub. Do not stack them.
Step 5: Inspect the battery compartment. Look for corrosion, rust, or damage. Clean thoroughly with a wire brush and vacuum or blow out debris.
2.4 Inspecting and Preparing Cables
Now is the perfect time to inspect your cart’s cables.
Check:
-
Corrosion: White or green crusty buildup indicates corrosion. Clean with a wire brush or replace cables if severe.
-
Fraying: Any exposed copper strands mean replace.
-
Lug condition: Battery terminals should be clean and not cracked.
If your lithium battery uses different terminal sizes (M8 is common), you may need new cables or adapter lugs.
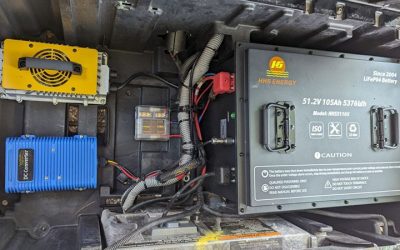
Part 3: Installing Your Lithium Battery
3.1 Positioning the Battery
Lithium batteries are significantly smaller and lighter than the multi-battery lead-acid packs they replace. This gives you flexibility in placement.
Considerations for Placement:
-
Weight distribution: Place the battery centrally if possible to maintain balanced handling.
-
Cable reach: Ensure main cables comfortably reach the terminals.
-
Accessibility: Leave enough space to access the battery’s ON/OFF switch (if equipped) and terminals.
Mounting Options:
| Method | Description | Best For |
|---|---|---|
| Existing Tray | Place battery in original location, possibly using spacers | Simplicity, minimal modification |
| Custom Mounting | Fabricate or use included brackets to secure battery | Uneven compartments, optimal weight distribution |
| Side Mount | Mount vertically against compartment wall | Space-saving in smaller carts |
Securing the Battery:
Even though lithium is lighter, it must be secured. A flying battery in a turning cart is dangerous. Use:
-
Heavy-duty Velcro straps
-
Ratchet straps
-
Custom metal brackets
-
Original hold-downs if adaptable
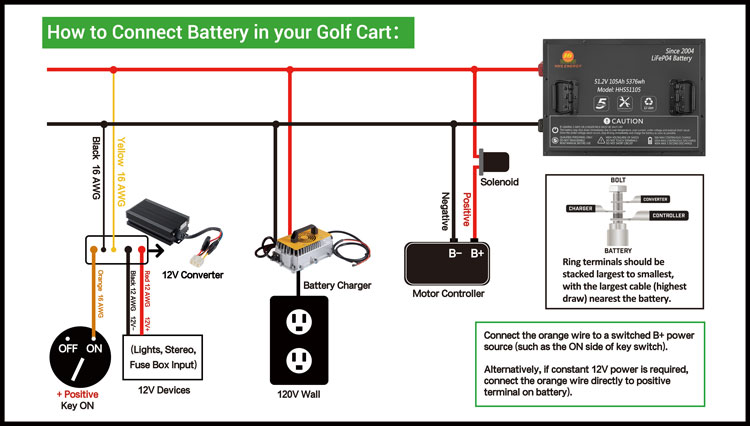
3.2 Connecting the Main Power
Before connecting anything:
-
Ensure the lithium battery’s ON/OFF switch is in the OFF position.
-
Verify with a multimeter that the battery shows proper voltage (should match your cart’s system voltage).
Connection Order:
Step 1: Connect the main positive cable (from the cart’s controller/motor) to the battery’s positive terminal.
Step 2: Tighten securely. Lithium terminals are typically bolts or threaded studs. Torque to manufacturer specifications (usually 8–10 Nm).
Step 3: Connect the main negative cable to the battery’s negative terminal.
Step 4: Tighten securely.
Step 5: Double-check that both connections are tight and there’s no chance of cables vibrating loose.
3.3 Connecting Accessories
Many golf carts have accessories: lights, voltage meters, USB chargers, radios, etc.
Where Accessories Connect:
On a lead-acid system, accessories often connected to specific points in the battery bank to achieve desired voltage (e.g., 12V for lights from a 48V system using a voltage reducer).
With Lithium:
-
12V accessories must connect through a DC-to-DC converter (voltage reducer) if your cart operates at 36V or 48V.
-
Some lithium batteries have built-in 12V outputs. Check your battery’s specifications.
-
If not, you’ll connect your 12V accessories to a separate reducer wired to the main battery terminals.
Wiring Tip: If you’re unsure about accessory wiring, consult a professional or refer to your cart’s wiring diagram. Incorrect connections can damage accessories or the battery.
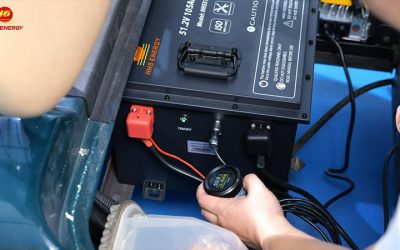
3.4 Installing the Battery Management System (BMS) Display (If Equipped)
Many lithium batteries include a separate display module that shows:
-
State of charge (percentage)
-
Voltage
-
Temperature
-
Cell balance information
Installation typically involves:
-
Mounting the display in a visible location (dashboard area works well).
-
Running the communication cable from the battery to the display.
-
Connecting power if the display requires it (some are powered through the communication cable).
Part 4: Charger Installation and Setup
4.1 Why You Need a Lithium Charger
This is non-negotiable. Using your old lead-acid charger will:
-
Fail to fully charge the lithium battery
-
Potentially damage the battery’s BMS
-
Create a safety hazard
Lithium chargers use a different voltage profile: Constant Current / Constant Voltage (CC/CV) . Lead-acid chargers use multi-stage profiles that don’t match lithium requirements.
4.2 Installing the Charger
Onboard vs. Offboard Chargers:
| Type | Description | Pros | Cons |
|---|---|---|---|
| Onboard | Mounted permanently in cart | Always with you, convenient | Exposed to elements, adds weight |
| Offboard | Separate unit, plug in to charge | Protected from elements, lighter cart | Can forget it, must carry |
Onboard Installation Steps:
-
Choose a mounting location away from direct water exposure and with adequate ventilation.
-
Secure the charger using supplied brackets or hardware.
-
Connect AC input to a standard plug mounted on the cart (often in the charger receptacle).
-
Connect DC output to the battery terminals (or to a dedicated charging port).
-
Ensure all connections are tight and protected.
Offboard Setup:
-
Simply plug the charger into a standard wall outlet.
-
Connect the charger’s DC plug to the cart’s charging port (or directly to the battery if no port exists).
4.3 Charging Port Considerations
If your cart has an existing charging receptacle, it may or may not work with your new lithium charger.
Compatibility Check:
-
Verify connector type matches.
-
Verify voltage rating matches.
-
If incompatible, you have options:
-
Replace the receptacle with one matching your new charger
-
Install a new dedicated charging port
-
Bypass the receptacle and connect directly (temporary solution only)
-
Part 5: First Power-Up and Testing
5.1 Initial System Check
Step 1: Turn the lithium battery’s ON/OFF switch to the ON position. You may hear a soft click as the BMS activates.
Step 2: Check the battery’s display or use a multimeter to verify voltage at the terminals.
Step 3: Turn the cart’s key switch to ON (or forward/reverse).
Step 4: Listen for any unusual sounds. Smell for any burning odors (there should be none).
Step 5: Slowly press the accelerator. The cart should move smoothly.
5.2 Testing All Systems
Drive Test:
-
Drive forward and reverse slowly, checking for smooth operation.
-
Test on a slight incline to verify hill-climbing power.
-
Listen for any clicking from solenoids or contactors (normal operation).
Accessory Test:
-
Turn on lights. They should be bright and steady.
-
Check any voltage displays or meters—they should show accurate readings.
-
Test USB chargers, radios, or other accessories.
Charger Test:
-
Plug in the charger. The charger’s indicator should show it’s connected (usually a green or red light).
-
Verify the battery’s display shows charging voltage increasing.
-
Let it charge for at least 30 minutes to confirm proper operation.
5.3 BMS Configuration (If Applicable)
Some lithium batteries allow BMS parameter adjustment via app or display:
-
Low voltage cutoff: Typically set around 2.5V–2.8V per cell.
-
High voltage cutoff: Typically set around 3.65V per cell.
-
Temperature limits: Usually 0°C to 55°C charging, -20°C to 60°C discharging.
Unless you understand lithium battery parameters, leave these at factory settings.
Part 6: Cable Management and Final Touches
6.1 Organizing Your Wiring
A professional installation looks clean and is safer.
Cable Management Tips:
-
Route cables away from sharp edges that could chafe insulation.
-
Use zip ties to bundle cables neatly.
-
Keep positive and negative cables separated where possible to reduce electromagnetic interference.
-
Ensure cables don’t interfere with moving parts (suspension, steering, etc.).
6.2 Securing Loose Components
-
Double-check that the battery is firmly secured.
-
Ensure any voltage reducers, displays, or other components are mounted securely.
-
Verify that the charger (if onboard) is properly mounted and won’t vibrate loose.
6.3 Labeling
Consider adding new labels:
-
“Lithium Battery – Use Only Lithium Charger”
-
Emergency shutdown procedure
-
Date of installation
-
Contact information for support
Part 7: Understanding Your New System
7.1 How to Read Your Battery Display
Most lithium batteries include a state-of-charge display that’s far more accurate than the old “fuel gauge” on lead-acid carts.
Typical Display Readings:
-
100%: 54.4V–58.4V (depending on cell count)
-
50%: 51.2V–52.8V
-
20%: 48.0V–49.6V (time to charge)
-
0%: Varies by BMS cutoff setting
Voltage vs. Percentage: Unlike lead-acid, lithium voltage stays relatively flat through most of the discharge, then drops rapidly near cutoff. This is normal—don’t panic when you see voltage drop in the last 10%.
7.2 Charging Behavior
What to Expect:
-
Charger may run at full power initially (constant current phase).
-
Near full charge, current will taper off (constant voltage phase).
-
Charger will shut off automatically when complete.
-
Some chargers enter “maintenance mode” or simply turn off.
Charging Time: Expect 2–4 hours for a full charge from 20% to 100%.
7.3 Range Estimation
Your range will depend on:
-
Battery capacity (Ah)
-
Terrain (hilly vs. flat)
-
Driving style (aggressive vs. gentle)
-
Payload (number of passengers, cargo)
Typical Range Estimates:
-
48V 105Ah: 35–45 miles
-
48V 160Ah: 50–70 miles
-
36V 105Ah: 25–35 miles
Track your actual range over the first few weeks to understand your specific usage.
Part 8: Troubleshooting Common Issues
8.1 Cart Won’t Move
Possible Causes:
-
Battery switch is OFF.
-
BMS in protection mode (low voltage, high temperature, short circuit).
-
Loose connection.
-
Cart’s controller issue.
Solutions:
-
Verify battery switch is ON.
-
Check battery display for error codes.
-
Reset BMS by turning battery OFF, waiting 30 seconds, then ON.
-
Check all cable connections.
-
Verify charger isn’t still connected (some carts disable drive when charging).
8.2 Reduced Range
Possible Causes:
-
Aggressive driving habits.
-
Increased payload.
-
Cold weather (lithium capacity temporarily reduces in cold).
-
BMS settings incorrect.
Solutions:
-
Adjust driving style (smooth acceleration helps).
-
Preheat battery in cold weather if possible (some batteries have built-in heating).
-
Verify BMS settings are appropriate.
8.3 Charger Not Working
Possible Causes:
-
No AC power.
-
Loose DC connection.
-
BMS has disabled charging (too cold, too hot, cell imbalance).
-
Charger fault.
Solutions:
-
Verify outlet has power.
-
Check all connections.
-
Check battery temperature (allow to warm up if below 0°C).
-
Try a different outlet.
8.4 Error Codes on Display
Refer to your battery’s manual for specific error code meanings. Common codes:
-
E01: Cell undervoltage
-
E02: Cell overvoltage
-
E03: Temperature fault
-
E04: Short circuit protection
Most errors reset by cycling the battery OFF/ON after correcting the underlying condition.
Part 9: Maintenance and Care
9.1 What You No Longer Need to Do
Celebrate! You never need to:
-
Add water
-
Clean corrosion
-
Perform equalization charges
-
Worry about sulfation
-
Store on a tender during short-term storage
9.2 What You Still Should Do
Periodic Checks (Every 1–2 Months):
-
Visually inspect terminals for tightness.
-
Check for any physical damage to the battery case.
-
Verify the battery is still securely mounted.
-
Clean any dust or debris from the battery compartment.
Software/Firmware Updates:
Some smart batteries offer firmware updates via app. Check periodically if your manufacturer provides updates.
Storage (Long-Term):
-
Store at 50–80% charge for optimal longevity.
-
Lithium self-discharges very slowly (1–3% per month).
-
No need for continuous trickle charging.
-
If storing for 6+ months, check charge level periodically.
9.3 Winter Storage Tips
Unlike lead-acid, lithium handles cold storage well, but with caveats:
Do:
-
Store in a cool, dry place (above -20°C is fine).
-
Charge to 50–80% before storage.
-
Disconnect the battery if storing for months.
Don’t:
-
Charge a frozen battery (below 0°C).
-
Store at 100% charge for months (reduces lifespan slightly).
-
Leave the battery in direct summer sun (heat is harder on lithium than cold).
Part 10: Maximizing Your Lithium Investment
10.1 Charging Habits for Long Life
-
Partial charges are fine – Unlike lead-acid, lithium doesn’t need full cycles. Charge whenever convenient.
-
Avoid deep discharges – While lithium handles deep cycles well, staying above 20% extends life.
-
Store at moderate charge – For long storage, 50% is ideal.
10.2 Performance Optimization
-
Check tire pressure – Proper inflation maximizes range.
-
Smooth driving – Gradual acceleration saves energy.
-
Reduce unnecessary weight – Clean out the cart if you carry extra gear.
10.3 When to Consider an Upgrade
Lithium batteries typically last 8–12 years. Signs it might be time:
-
Noticeable range reduction (below 70% of original).
-
BMS frequently showing cell imbalance.
-
Physical swelling or damage (rare but possible).
Conclusion: Enjoy Your Upgraded Cart
Congratulations! You’ve successfully upgraded your golf cart to lithium power. You’ve transformed your driving experience from one of maintenance and compromise to one of consistent performance and freedom.
What You’ve Gained:
-
2–3× the range of lead-acid
-
5–10× longer battery life
-
Zero maintenance
-
Consistent hill-climbing power all day
-
Faster charging
-
Significant weight reduction
What’s Next:
-
Take your cart for a long drive and enjoy the new performance.
-
Educate other cart owners about the benefits of lithium.
-
Keep this guide handy for reference.
Remember: Your lithium battery is a sophisticated piece of technology, but it’s also remarkably simple to live with. Charge when convenient, drive with confidence, and enjoy years of trouble-free operation.
Appendix: Quick Reference Guide
Voltage Reference Chart (48V LiFePO₄)
| State of Charge | Voltage Range |
|---|---|
| 100% | 54.4V – 58.4V |
| 90% | 53.6V – 54.4V |
| 80% | 53.0V – 53.6V |
| 70% | 52.4V – 53.0V |
| 60% | 51.8V – 52.4V |
| 50% | 51.2V – 51.8V |
| 40% | 50.4V – 51.2V |
| 30% | 49.6V – 50.4V |
| 20% | 48.8V – 49.6V |
| 10% | 48.0V – 48.8V |
| Cutoff | ~44.0V – 48.0V (BMS dependent) |
Safety Checklist
-
Battery securely mounted
-
All connections tight
-
Cables protected from chafing
-
Charger compatible and properly connected
-
Emergency shutoff accessible
-
No tools left in battery compartment
First 30 Days Checklist
-
Monitor range on full charge
-
Verify charger completes cycle properly
-
Check connections after first few temperature cycles
-
Test all accessories thoroughly
-
Familiarize yourself with battery display readings
This guide is provided for informational purposes. Always follow your specific battery manufacturer’s instructions and safety guidelines. If you’re unsure about any step, consult a qualified golf cart technician.